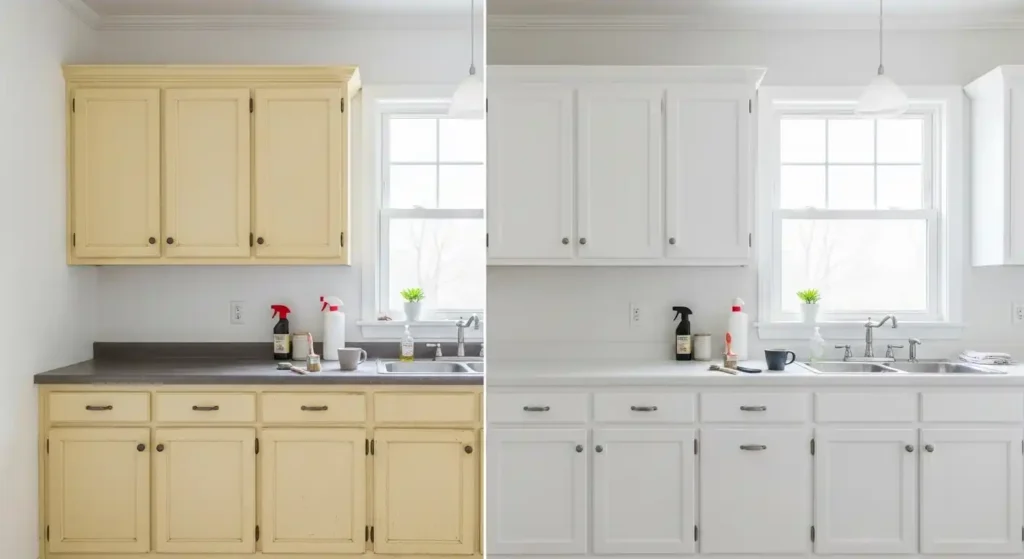
If you’ve ever walked into your kitchen one morning and thought, “Wait… weren’t these cabinets whiter a few years ago?” — you’re not imagining it.
Over time, even the brightest white kitchen cabinets can slowly shift to a yellowish tint. It happens so gradually that most homeowners don’t notice until the color change becomes obvious.
But why does this happen? From sunlight exposure to cooking fumes and aging finishes, there are a few key culprits behind those yellow tones.
Let’s uncover what causes it — and how you can keep your cabinets looking fresh and bright for years to come.
Contents
The Primary Culprits: Why Cabinets Go from White to Yellow
The yellowing of kitchen cabinets is rarely due to a single cause. It’s typically a combined attack from what’s floating in the air, the sunlight streaming through the window, and even the type of finish that was originally applied.

1. The Paint & Finish Factor: Oxidation and Alkyd Paints
This is, perhaps, the most insidious cause of yellowing, as it’s built into the chemistry of the finish itself.
The primary ingredient responsible is a chemical process called oxidation, which happens when specific paint components react with oxygen in the air. This is especially true for older or lower-quality oil-based (alkyd) paints and some varnishes.
- The Alkyd Problem: Traditional oil-based paints use an oil resin (like linseed oil) as a binder. Over time, and even without external grease or dirt, these resins naturally cure and break down when exposed to air and light, creating a yellowish polymer. This yellowing is often more pronounced in areas that receive less sunlight (like the inside of doors or darker corners), which is counter-intuitive but a clear sign of an alkyd paint issue.
- The Modern Solution: Modern, high-quality water-based acrylic or latex paints are formulated with non-yellowing resins, making them the gold standard for long-lasting, bright white finishes in high-traffic areas like kitchens.
2. The Kitchen Environment: Grease, Smoke, and Steam
Your kitchen is a high-performance workspace, and the by-products of cooking are a major factor in discoloration.
- Airborne Grease Particles: Every time you fry, sauté, or boil, microscopic particles of cooking oil, grease, and moisture are released into the air. Even with a range hood, these sticky particles float and eventually settle on every surface, especially the cabinets above the stove and on the ceiling. Over time, this thin, tacky film accumulates dust and grime, creating a visible, dark yellow-to-brownish buildup.
- Heat and Steam: High heat and persistent steam (from boiling water, dishwashers, or ovens) break down the cabinet’s protective finish faster. This compromised finish then becomes a magnet for airborne contaminants.
3. The Great Fader: Ultraviolet (UV) Light Exposure
Just as the sun can fade a favorite shirt or a piece of outdoor furniture, it affects your cabinet finish.
- Pigment Breakdown: The UV rays from direct sunlight break down the chemical bonds and pigments in the paint and clear coat. On white finishes, this degradation is often seen as a gradual, uneven yellowing or fading.
- Location Matters: Cabinets facing large, sunny windows are typically the most affected, with the discoloration clearly visible on the side of the cabinet that receives the most intense light.
Comparing the Discoloration Sources
To better understand whether you have a paint problem or a cleaning problem, here is a comparison of the key causes.
| Factor | Primary Cause of Yellowing | Location/Appearance Clues | Ease of Removal | Prevention Strategy |
| Oil-Based Paint/Finish (Oxidation) | Chemical breakdown of oil resins in the paint. | Often more noticeable in low-light, shaded areas (e.g., inside cabinet doors, behind hardware). Yellowing is uniform. | Very Low (Requires professional refinishing/repainting). | Use high-quality water-based acrylic or hybrid enamel paint. |
| Cooking Grease & Smoke | Accumulation of sticky airborne particles, dust, and grime. | Most severe on upper cabinets, around the range hood, and near the stove. Yellowing is often tacky and dirty. | High (Can be removed with a quality degreaser and deep cleaning). | Use a powerful range hood and wipe cabinets regularly. |
| UV Light Exposure (Sunlight) | Degradation of paint pigments by ultraviolet rays. | Concentrated on cabinets facing large, sunny windows. Yellowing is uneven and directional. | Low (Discoloration is often permanent within the finish). | Install UV-filtering film on windows or use blinds/curtains. |
| Cleaning Products | Residue from harsh chemicals (like ammonia) or abrasive scrubbing. | Patchy, streaky yellowing or a dull, worn appearance. | Medium (May require gentle residue removal or mild buffing). | Use gentle, non-abrasive cleaners and soft cloths. |
Restoring and Preventing: A Two-Step Strategy
The solution to yellowed cabinets falls into two distinct categories: cleaning (for surface-level buildup) and refinishing (for deep, chemical discoloration).
Part 1: How to Clean Yellowed Cabinets (Addressing Surface Buildup)
If the yellowing is greasy, sticky, and concentrated near the cooking area, a deep degreasing is usually the answer.
Recommended Cleaning Solutions
- The Gentle Degreaser: Mild dish soap (like Dawn) mixed with warm water. The soap is formulated to break down kitchen grease and is safe for most finishes.
- The Natural Power Paste: A paste made of baking soda and water. Apply the paste to a soft cloth and gently rub the affected area. Baking soda is a mild abrasive that can lift stubborn stains without scratching most durable finishes.
- The Acidic Cut: A solution of equal parts white vinegar and warm water. Vinegar is an excellent natural degreaser and deodorizer. Apply with a microfiber cloth and rinse immediately with plain water to prevent the acid from sitting on the finish for too long.
Cleaning Dos and Don’ts
| Do This | Avoid This |
| Use a Microfiber Cloth: Soft, absorbent, and non-abrasive. | Magic Erasers or Melamine Foam: These are micro-abrasives and can wear away the cabinet’s protective topcoat, leading to faster yellowing/damage in the future. |
| Rinse and Dry Thoroughly: Always follow a cleaning solution with a wipe-down of plain water, then dry the surface with a separate towel. Leftover residue attracts dirt. | Harsh Chemicals (Bleach, Ammonia, Solvents): They can strip the finish, soften the paint, or actively react with the coating to cause permanent yellowing or damage. |
| Clean Section by Section: Work in small areas, especially with stronger solutions, to ensure quick rinsing and drying. | Letting Solutions Sit: Never allow cleaning solutions to pool or sit on the cabinet surface for an extended period. |
Part 2: Long-Term Prevention & Choosing the Right Finish
If cleaning doesn’t work, the yellowing is likely a chemical change within the paint itself. This means the only permanent fix is repainting or refinishing. For long-term peace of mind, prevention is paramount.
Preventative Maintenance Pros and Cons
| Prevention Strategy | Pros | Cons |
| Regular Wiping (Weekly/Monthly) | Removes grease/dust before it sets; maintains the finish’s integrity. | Requires consistent effort; must use appropriate, gentle cleaners. |
| Using Range Hood (Every time you cook) | Dramatically reduces airborne grease and steam that settle on cabinets. | Hood may be noisy; some older/underpowered hoods are less effective. |
| UV-Filtering Window Film/Shades | Blocks harmful UV rays from degrading the paint pigments. | Can slightly reduce the amount of natural light entering the kitchen. |
| Install Knobs/Pulls | Prevents direct hand contact, minimizing the transfer of skin oils and dirt to the paint. | An added expense if your cabinets are currently handle-less. |
The Final Solution: Choosing a Non-Yellowing Finish
If you are repainting or installing new cabinets, the choice of finish is the single most important decision for avoiding future yellowing.
- Water-Based Acrylic or Hybrid Enamels (The New Standard):
- Pros: Highly resistant to yellowing, especially when compared to alkyds. Excellent durability, easy cleanup, and lower volatile organic compounds (VOCs).
- Cons: Historically, they weren’t as hard/durable as oil, but modern formulas (especially hybrid enamels) have largely closed this gap.
- Oil-Based (Alkyd) Paints (The Traditional Finish):
- Pros: Known for a very hard, durable finish; often a smoother look.
- Cons: Highly prone to yellowing over time, especially in low-light environments. Long drying/curing time and high VOCs.
Conclusion: Taking Control of Your Kitchen’s Aesthetic
The yellowing of kitchen cabinets is not a sign of poor ownership; it is a near-inevitable consequence of the combined effects of chemistry, environment, and daily use.
For many years, oil-based paints were the industry standard, and their eventual yellowing was simply a known trade-off for a durable finish. Today, however, homeowners have the power to control this process.
By utilizing proper ventilation, implementing a simple, gentle, and regular cleaning routine, and choosing modern, non-yellowing water-based acrylic or hybrid enamel finishes for your next project, you can ensure your bright, beautiful kitchen cabinets stay that way for a decade or more.
The battle against the yellow tinge is a marathon, not a sprint, but with the right knowledge, you can emerge victorious.